Corvus is no ordinary crow—he’s a flirty, clever showstopper with feathers darker than midnight and a neon background that screams drama! With his bold lashes, sleek wings, and a personality as dubious as it is charming, Corvus is here to strut his stuff and steal the spotlight (and maybe your snacks). A perfect mix of mischief, elegance, and vibrant color!
Warning: Crafting Corvus may lead to suspiciously missing sequins, threads, and buttons… Don’t say I didn’t warn you!
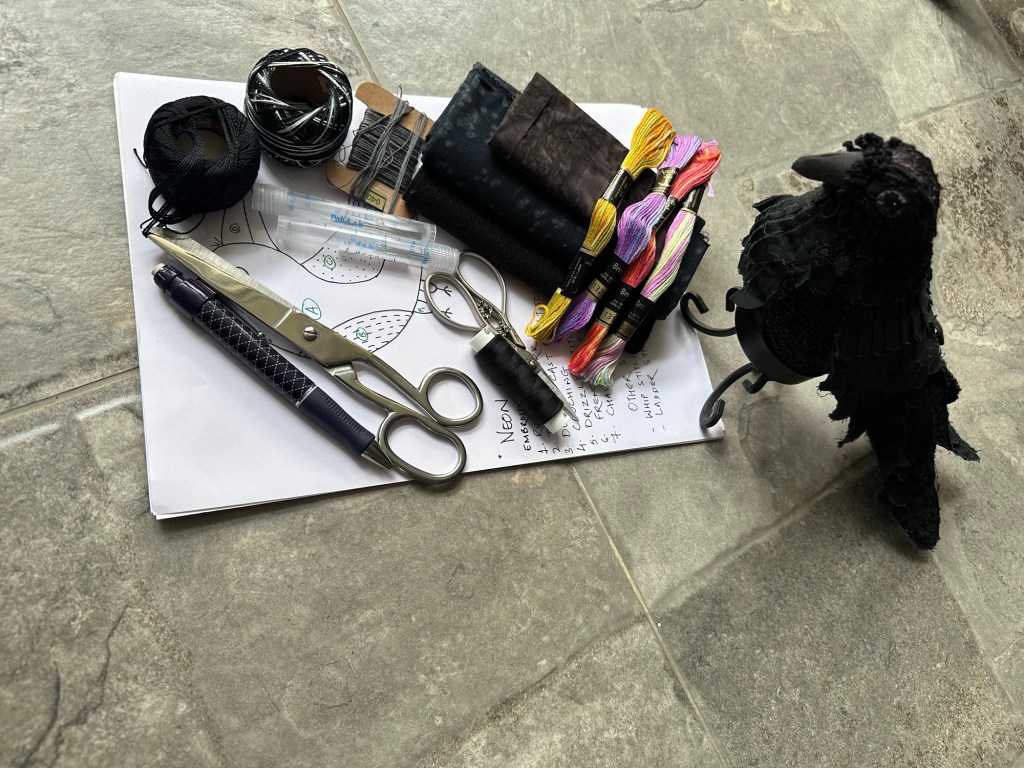
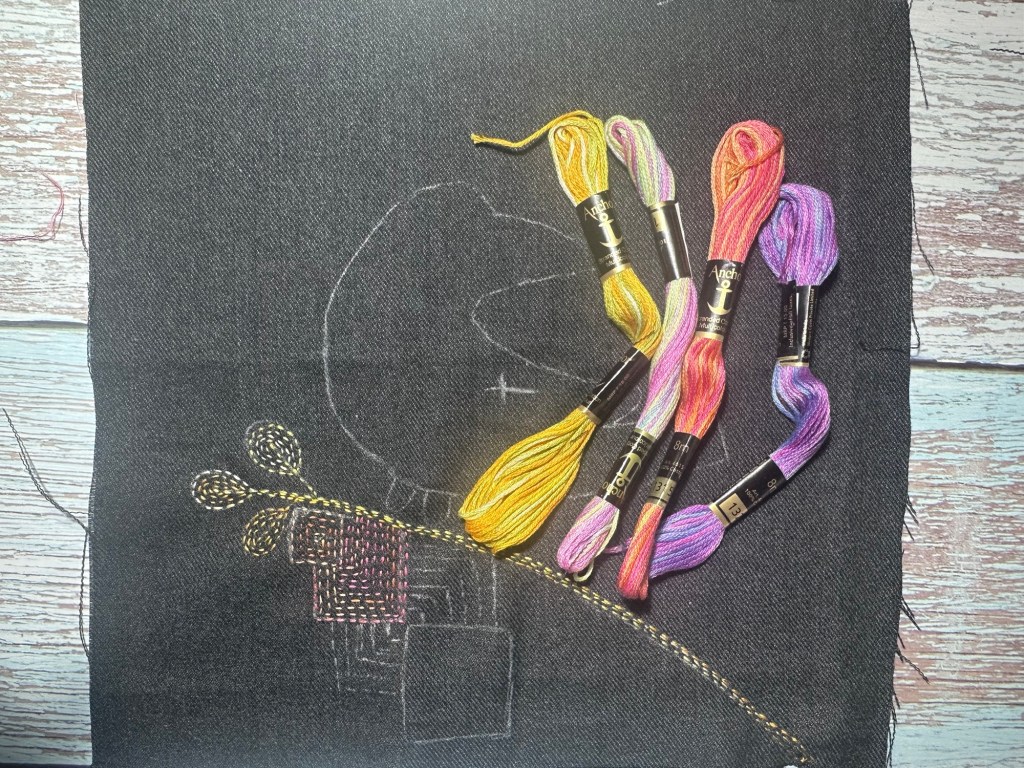
Step 1 Collect All the Supplies
1-Background wool fabric in dark grey (a perfect moody stage for Corvus’ antics).
2-Black felt and fabric for Corvus. Combining batik fabric and felt creates gorgeous texture contrasts, giving Corvus an extra layer of sass and sophistication.
3-Embroidery floss in bold neon colors (to fill that dark grey background with electric vibes and to give his flirty personality the spotlight it deserves ).
4-Threads to match the appliqué pieces (because Corvus has high standards).
5-Embroidery needles for fancy stitches (Corvus loves a touch of drama).
6-Fine needles to stitch the appliqué pieces (precision is everything when creating sass).
7-Appliqué pins (to stop Corvus from flying off the background).
8-Scissors sharp enough to keep up with Corvus’ sharp wit.
9-Pattern to trace (because this crow doesn’t wing it).
10-Freezer paper (to keep those pieces crisp and poised).
Optional Supplies: A few shiny embellishments (Corvus loves bling) and some chocolate to bribe yourself into stitching those neon details.
Now that you’ve got everything, prepare yourself for some dramatic wing flapping and suspicious side-eyes as Corvus comes to life!
Step 2: Prepare the Appliqué Pieces
(Time to give Corvus his dramatic flair!)
1. Trace the Design:
• Place the appliqué pattern on a light box, then place freezer paper on top and carefully trace the design.
• No light box? No problem! Tape the pattern to a window glass and trace it in natural daylight. (Pro Tip: This method works like magic—but only during the day. I used this hack until my studio was ready and then with the help of my carpenter I made a proper light box!)
• For felt pieces: Leave 1/16 inch around the edges when cutting the freezer paper tracing.
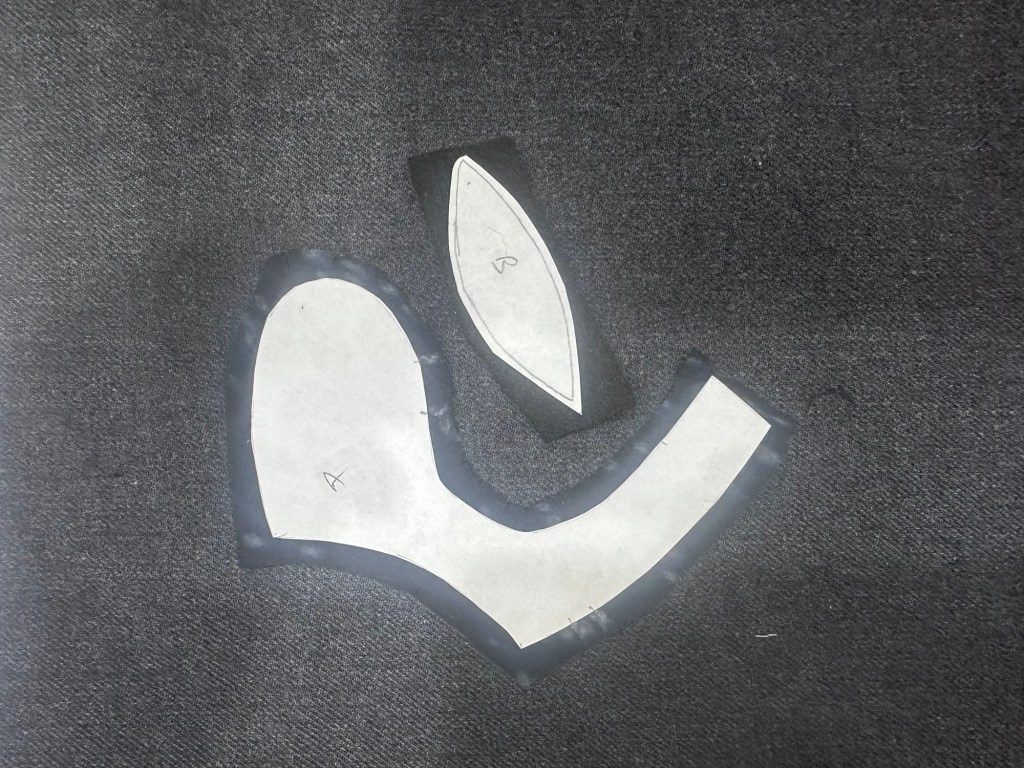
• For fabric pieces: Cut the freezer paper exactly on the traced lines to fold under the raw edges.
2. Iron the Freezer Paper:
• For felt pieces:Place the freezer paper shiny-side down onto the felt. Cover the felt with a muslin cloth to prevent while ironing, and iron gently for a secured hold.
• For Fabric Pieces: Place the pattern cutout of freezer paper shiny-side down onto the fabric.
• Cut the fabric around the freezer paper, leaving a scant ¼ inch seam allowance for turning under the raw edges.
Mark Overlapping Areas:
•Identify the areas on the fabric appliqué pieces where they will overlap with other felt or fabric pieces.
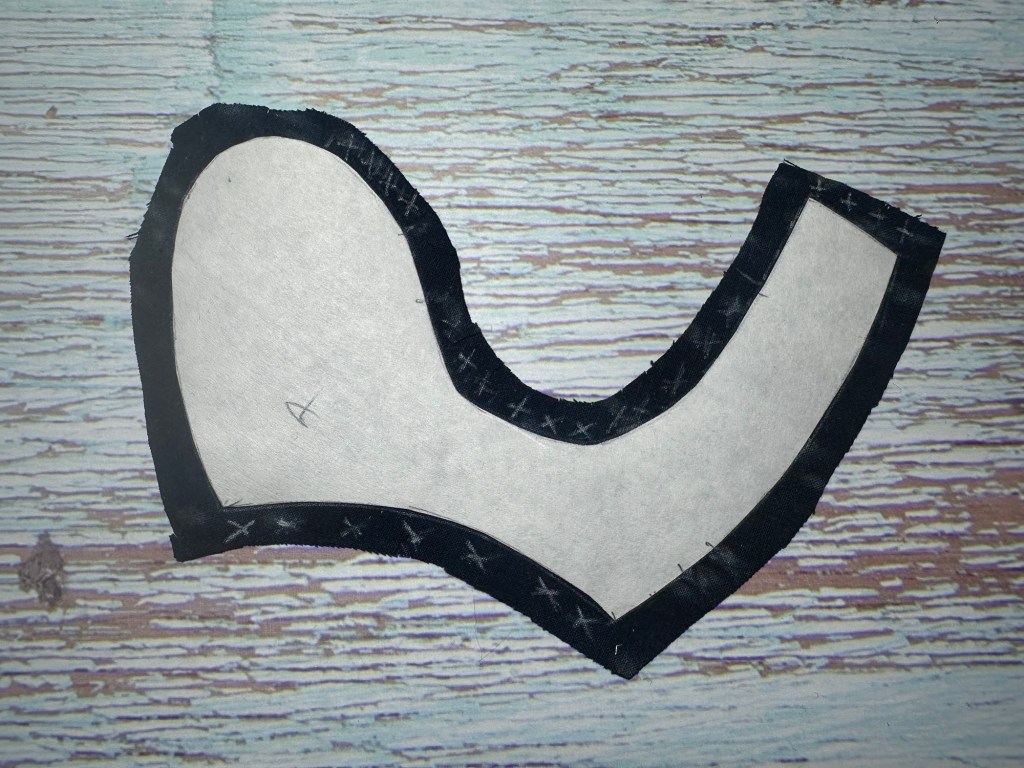
•Mark a cross on these seam areas to indicate they do not need to be turned under. This ensures smooth layering and prevents unnecessary bulk.
Turn Under the Raw Edges:
• You can turn under the raw edges while the freezer paper is still on the fabric, folding along the paper edges for precision.
• Or, go old school (like I do!):
• Draw an outline around the freezer paper onto the fabric.
• Remove the freezer paper.
• Mark all the overlapping edges clearly.
• Then, turn under the raw edges as you baste the appliqué piece in place. (It may take longer, but it’s Corvus-approved!)
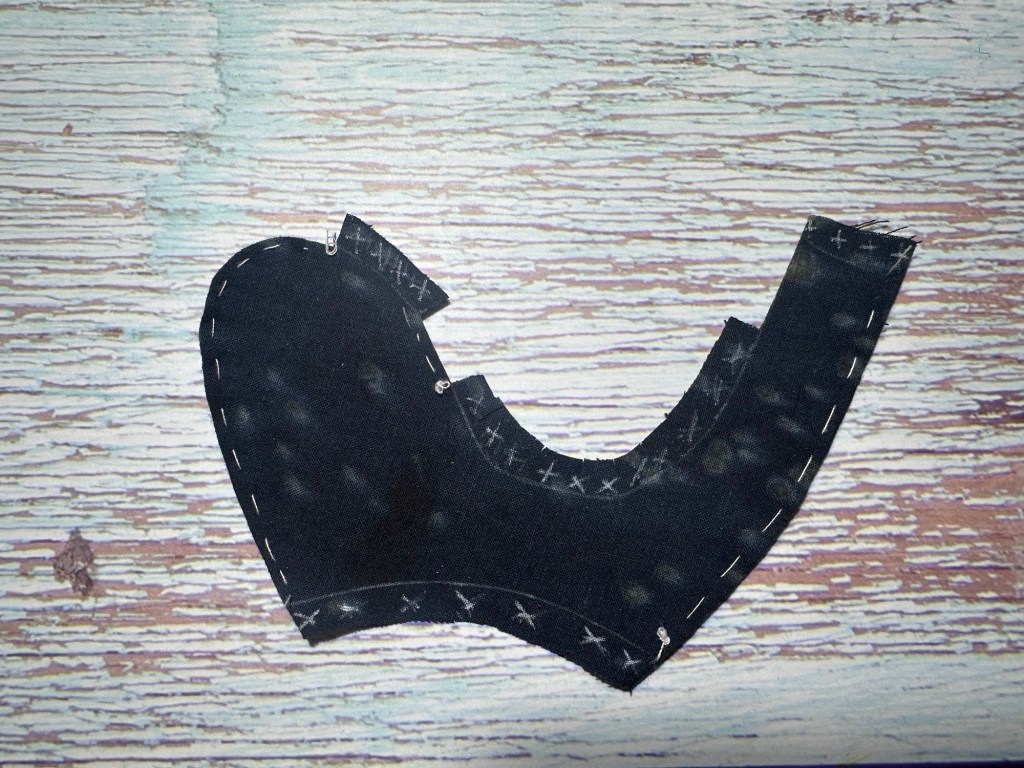
• Fold the raw edges under along the freezer paper lines to create clean, crisp edges.
Step 3: Let’s Build Corvus—
One Sassy Stitch at a Time! *(Because Corvus isn’t just a crow—he’s a star!)
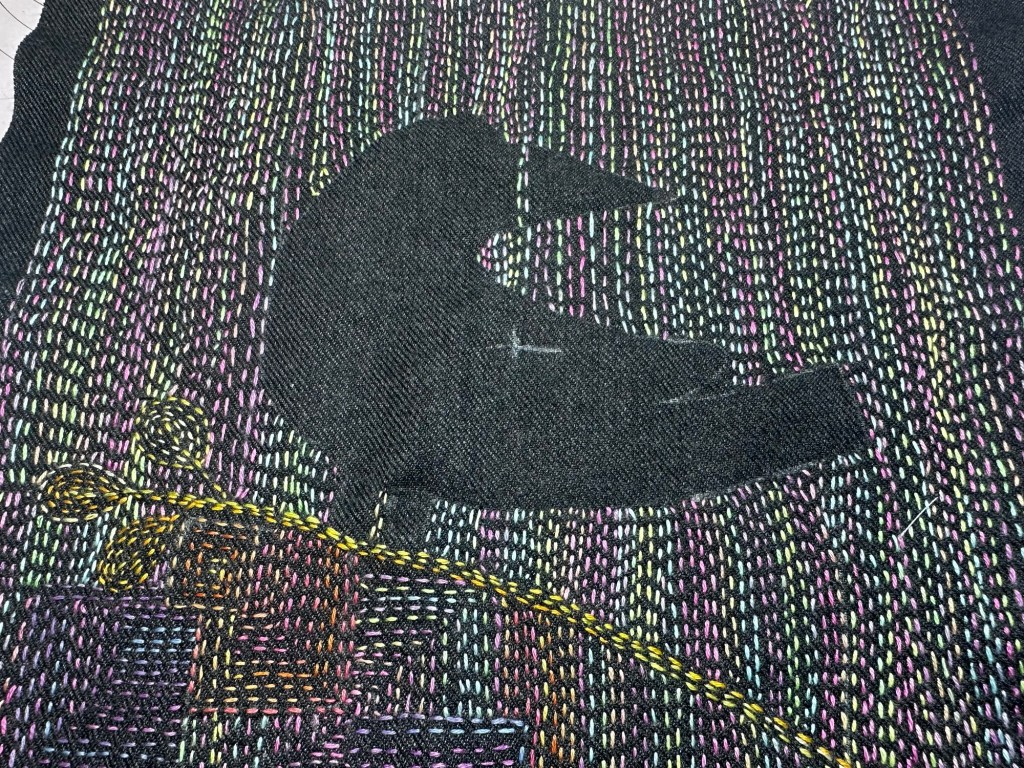
1. Create the Neon-tastic Background:
• The background is the stage, and Corvus deserves nothing less than a neon-lit spotlight!
• Use your brightest neon variegated thread and go wild with running stitches. Follow any pattern your heart desires—straight lines, zigzags, spirals—it’s all about making those black and grey tones pop!
• I used the best threads in my collection because Corvus would never settle for second-best. Remember, the brighter the background, the more Corvus will shine!
• Pro Tip: To avoid wasting your precious thread, roughly mark the outline of Corvus’ body on the background fabric. Leave that part unstitched since it’ll be hidden under the appliqué. Why stitch where no one will ever look? Corvus wouldn’t approve of such inefficiency!
2. Prepare the Appliqué Pieces:
• Get all your appliqué pieces ready as per the pattern. Treat them like puzzle pieces—they’re the building blocks of Corvus’ fabulousness!
• Follow the sequence outlined in the pattern when stitching them together (yes, there’s an order to the madness).

3. Do All the Surface Embroidery First:
• Think of this as Corvus’ glam squad—he needs to look perfect before his big debut! Here’s the breakdown:
• Eyelashes: Use Turkey Work for that dramatic flair. Think bold, fluttery, and unapologetically extra.
• Beak: Stem Stitch gives it that sharp, confident look—because Corvus always speaks his mind.
• Wings: Add texture and intrigue with a mix of French Knots and Back Stitch—perfect for dramatic wing flutters.
• Tail: Long, graceful, and stylish with Chain Stitch—the crow equivalent of a designer cape.
• Belly: Combine Running Stitch, Double Cast On Stitch, and Chain Stitch for a layered, textured look—because Corvus never skips abs day.
• Neck: Simple Running Stitch to balance all the drama elsewhere. (Corvus loves balance!)
4. Assemble Corvus:
• Now comes the fun part—start attaching the appliqué pieces together!
• Go slow, follow the sequence, and make sure every piece is perfectly in place. It’s like dressing Corvus for a red-carpet event.
Pro Tip: Corvus loves compliments, so make sure each stitch is impeccable. And don’t rush—he’s worth the effort!
Step 4: Sew Corvus on the Neon Stage (It’s showtime, folks! Let’s give Corvus the spotlight he deserves!)
1. Place Corvus on the Background:
• Position Corvus’ appliqué pieces on the neon-stitched background. Make sure he’s centered and ready to steal the show.
• Double-check the placement—you don’t want Corvus leaning awkwardly like he’s had one too many shiny worms.
2. Pin it Down:
• Use appliqué pins to secure Corvus’ pieces in place. Think of them as his personal bodyguards, keeping every feather (and stitch) right where it belongs.
3. Start Stitching:
• Use fine needles and matching thread to carefully sew Corvus onto the background fabric.
• Take your time with each stitch—Corvus is a perfectionist, after all.
• Keep checking for alignment as you go. A crooked wing or wonky beak could ruin Corvus’ big moment!
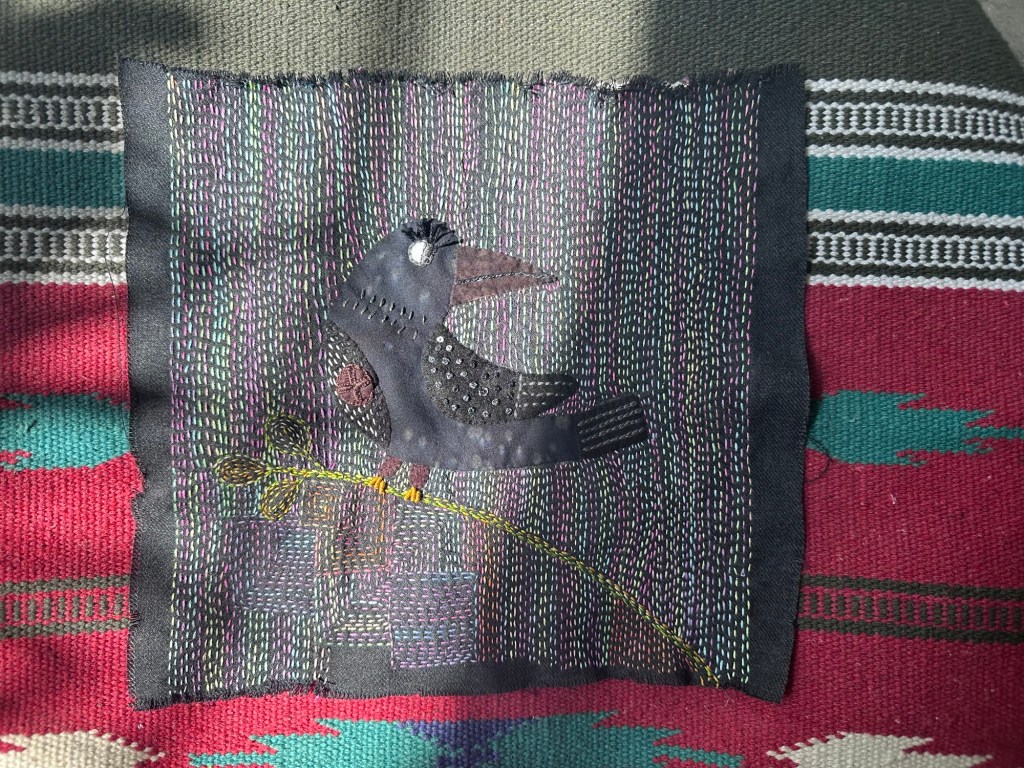
4. Admire Your Work:
• Step back and admire Corvus taking center stage. Give yourself a pat on the back—he’s looking like the charismatic, neon-backed superstar he was always meant to be!
